My Sunday Photo: 26 June 2016

Vista of TreesI’m not going to post about Britmums Live, today, because a) lots of people will – and better than I could – and b) I need to get my breath back, so to speak, after such a blast!

One evening last week, I just felt the need to unwind in natural surroundings. Fortunately, I had the opportunity. I find there’s something very stabilising about looking at things in nature that are so much older than myself. This picture is, of course, once again a part of Wollaton Park, Nottingham. One or two of the original cedar trees, planted in 1588, the year of the Spanish Armada, still survive. To stand underneath one on a hot summer day and breathe the scent is truly inspiring, and makes me think about all sorts of things.

We tend to get wrapped up in ourselves (maybe I can speak for others along with myself.) Surely, it’s always good to welcome what lifts us out of this. Oh… perhaps there is a connection with Britmums, after all.

It's kind to share!
facebooktwittergoogle_pluspinterest

My Sunday Photo: 19 June 2016

Baby ApplesLooking round my garden yesterday (June 18) I was glad to find these baby apples starting to swell. I’m hopeful of a good crop this year. From a photographic point of view, though, I love it when I can successfully capture some sense of the texture of something – in this case, that slight furriness, left from when the flower dies back to leave the beginnings of a fruit. Try clicking on the picture to enlarge it, and I think you’ll see what I mean. I’m not always successful, mind!

It's kind to share!
facebooktwittergoogle_pluspinterest

Photo Tutorial Challenge: B is for Bulb

I’m continuing my series of photo tutorials through the alphabet…

It’s pretty common knowledge that, if you select the ‘B’ setting on your camera (this will be either a mode option or a shutter speed option) the shutter will open when the button is pressed, and remain open until the same button is released. With the aid of good camera support such as a tripod, and a remote control device of some sort (so as to avoid jogging the camera) very interesting images can be obtained by keeping the shutter open for a long time – perhaps several minutes, at night!
I shall revisit this topic in more detail another time, but for now, I want to discuss how this designation leads us to a fascinating part of the history of photography, because that B stands for bulb.

Are we talking flowers, or lighting? Well, it’s the second one, but, as the saying goes, not as we know it. Not nowadays, anyway.

Very early in the histiory of photography, people realised that its scope could be increased by using artificial light, produced in some way or other. The sensitivity of early film was, in comparison with digital systems, or even modern film, abysmally poor, and so they were looking to produce a lot of light, even if only for a short time.

The first method that was developed was somewhat erratic in use, to say nothing of its inherent danger! You had to use a device that looked a bit like a very small version of a plasterer’s hawk, with a metal reflector shrouding three of the four sides. Built into the handle was a spring-loaded flint-and-steel system, which, when set off by a trigger button, sent up sparks onto the table part, as you might say. Now, in a small recess on this part, you put a measured dose of ‘flash powder’ – a mixture of magnesium powder and a powerful oxidising agent!

Remember seeing burning magnesium ribbon, in the chemistry lab? Now you can see how this worked, can’t you? When you pressed the trigger, the sparks ignited the magnesium, which burned very quickly, giving out its characteristic bright white light, which was reflected forwards. The reflector also protected the operator!

To take the photograph, you first opened the shutter in time-exposure mode (it wasn’t called ‘B’ yet) fired the flash system (you had to hold this level, of course) and then released the shutter. Flash photography was born, but now do see why I said it was dangerous?

The next development was the flashbulb (around the late 1920s.) Flashbulbs were similar to ordinary light bulbs, or as they are properly known, electric lamps, but the filament was surrounded by aluminium wool in an atmosphere of oxygen. Flash photography was now much more reliable, consistent, and safer (thanks to guarding the bulb, and later, giving the bulbs a safety coating (they always cracked.) Nor did flashbulbs make smoke and fumes, like flash powder did! The first ‘flashguns’ had a reflector, a guard, a bulbholder, and a simple battery circuit with a button switch to fire the bulb.

OK, so now, everything was a lot easier and safer to use, but the principle was the same: you opened the shutter, pressed the button on the gun, then closed the shutter. This has come to be termed the ‘open flash’ method. And this is how that shutter setting came to be called ‘bulb’!

Some time later came the next, very obvious, development, which, of course was to build an electrical switch into the shutter system, so that the flashbulb could be fired in synchronism with the operation of the shutter, at a fairly slow speed setting (say, 1/30th of a second.) This drastically simplified the procedure for taking flash pictures.

BUT… that term ‘bulb’ just stuck – for the operating mode where the shutter is open for as long as the release is held down!

Perhaps you’ll think about all this, next time you take a photo using electronic flash, or even LED flash on a smartphone. (by the way, electronic flash gradually started to make significant inroads into amateur photography from around 1970, although a xenon flash-tube was made as early as 1931.) For myself, I can only say that I have nothing but admiration and respect for all the pioneers of photography who have gone before us.

Electronic Flashgun

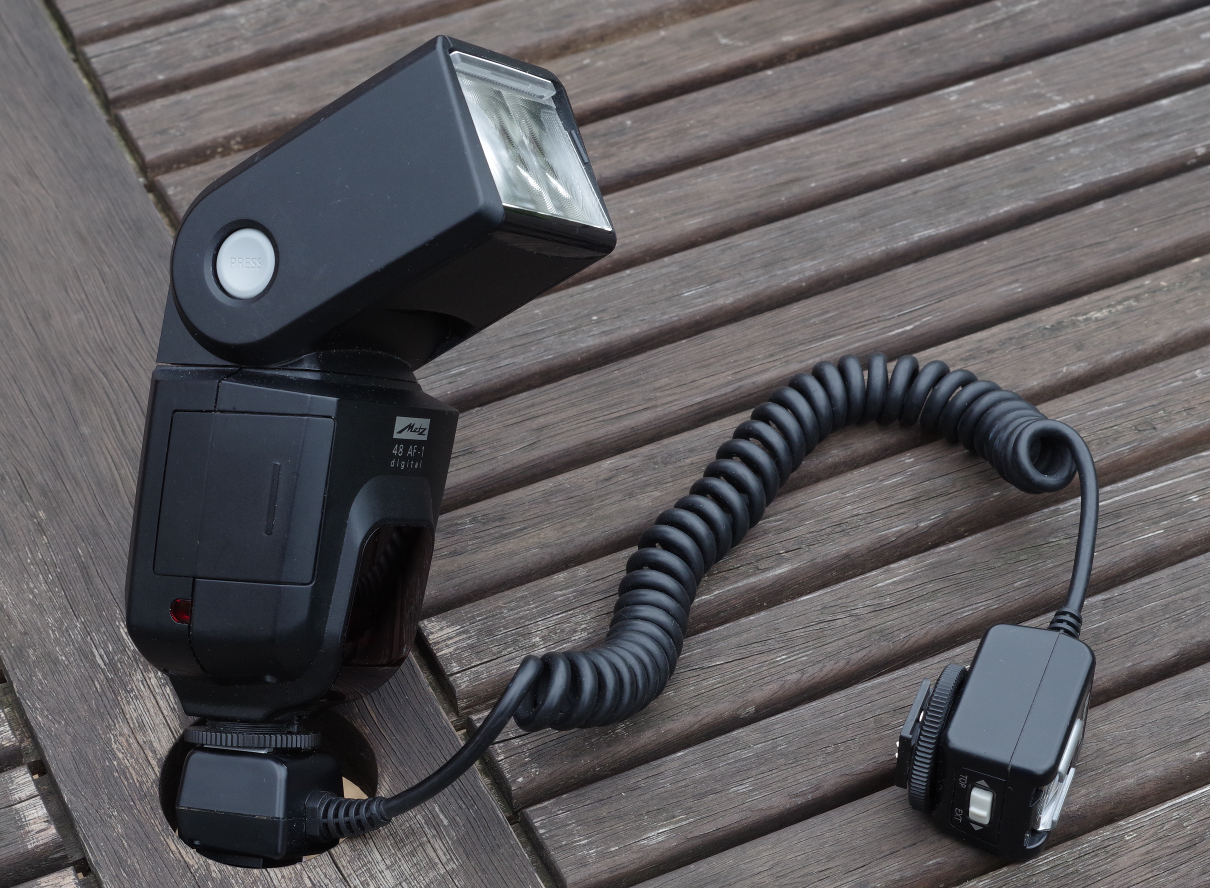
Here is a modern fully-featured electronic flashgun that I use. Flash has come a long way. (Oh, and yes, that is a garden table with an umbrella hole in it!)

Well now, that was going to be about all for now, but I’ll just deal with one practical issue. You’ll see that in the picture above, my flashgun has a cable fitted, so that it can be positioned away from the camera. This adds versatility, and in particular, helps to deal with the bugbear we all know as ‘red eye’ in pictures of people.
What happens is this: when strong light enters a person’s eye, it illuminates the back of the eye, where there are a great many tiny blood vessels. These are, of course, red! Now, if the source of light, i.e. the flashgun, and the camera lens are very close together, reflected red light will come back straight at the camera, because the flash-to-subject axis and the subject-to-camera axis are very nearly the same. Hence the eyes of the person in question will appear, in the image, to have red centres!
By far the best way to avoid this is to space the flashgun away from the camera, thus creating a significant angle between those two axes I mentioned. The problem goes away!

I hope all this is intelligible (and of interest.) As always, feedback is welcome, and much appreciated.

I’m linking to:

A Mum Track Mind
and:
Cuddle Fairy
and:
Diary of an imperfect mum
It's kind to share!
facebooktwittergoogle_pluspinterest

Photo Tutorial Challenge: A is for Aperture

This post is the first of a series, all to do with a challenge that I’ve set for myself. The idea is to write 26 posts in total, each with a title based on a different letter of the alphabet, all of them being informative about photographic topics, and, I hope, especially helpful to those of you who want to get more out of your photography, and not just stay in the ‘fully automatic program’ mode!
As I type this, I’m not sure how frequently I’ll get them done, but we’ll see… OK, here we go with the letter A!

The word aperture means an opening or a hole. In the context of photography, the opening in question refers to a hole in an opaque component which is built into a lens. In most cases, and certainly in lenses used with cameras like DSLRs, this component is in the form of a diaphragm made of several blades (typically 5 or 7) arranged in a circle. These blades are adjustable by a system of pivots, springs, levers and so on (obviously all very tiny) so as to vary the size of the approximately circular hole left in the middle – all a bit like the way the pupils of your eyes change in size. This adjusts the light-gathering power of the lens. Clever, eh?
Now we need to address a particular issue: how should we define the size of the opening? Can we just say that it’s set to 3mm, 6mm, or whatever? Well, unfortunately, that gives us a problem; the resulting light-gathering power (which is what we’re really interested in) isn’t determined by the absolute size of the opening, but its size as a factor of the focal length of the lens. Now, I’ll add a couple of things straight away: one, we’ll discuss focal length of lenses in detail another time, so stand by on that for now, and secondly, the bit in italics isn’t quite true, but it’s close enough for now, OK?
Right: now, in practice, the aperture size is typically way smaller than the the focal length, so it’s sensible to think of it as a fraction. If,say, the focal length of our lens is 100mm and the opening is set to 12.5mm in diameter, the aperture setting would be 100 divided by 12.5, or in simple algebra, f/8. And because saying ‘f over eight’ or whatever, is a bit of a mouthful, we just say ‘f eight’ or ‘f sixteen’ or whatever.
So now, a whole lot of things, that puzzle many newcomers to the practical science of photography, start to make sense. Let’s look at some of them, in the form of questions…

1. Why is, let’s say, ‘f eight’ a bigger aperture than, say, ‘f sixteen?
These are fractions, remember! Just as an eighth (⅛) is twice as much as a sixteenth (1/16) so f/8 is twice as much as f/16. Easy to see, now, isn’t it?
2. I know that the sequence of f numbers goes 1, 1.4, 2, 2.8, 4, 5.6, 8, 11, 16, 22, 32…
Yes that’s right. Go on.
And they tell me that each increment represents a change in light-gathering power equal to halving it, so f/11 will give me half the light-gathering of f/8…
Right again.
But 8 times 2 isn’t 11! Explain, please.
Ha! I thought we would get to that. This is a very important point. Remember, those ‘f numbers’ relate to focal length and diameter. BUT the amount of light that will get through the hole isn’t a function of its diameter, but its area, which in turn relates to the square of the diameter! So twice the diameter will give four times the light. To get just twice the light (or half as much) the factor for the diameter must be the square root of 2, which is about 1.4 (1.4 x 1.4 gives you 1.96.) Now look again at that sequence. Makes sense now, doesn’t it?
3. Why do photographers call a change of one aperture increment ‘one stop’ and refer to setting a small aperture as ‘stopping down?’
Well, nowadays, cameras can adjust the aperture setting using electronics and some extra mechanical bits and pieces. But before this, aperture was set by moving a ring on the lens. And so that you knew what you were doing (even without looking) this ring moved in clicks, from one detent point to another (a bit like the setting knob on a lot of modern washing machines.) Hence the term ‘stop’. This isn’t all that long ago, by the way.
But you’re OLD, Phil…
Yeah, yeah, no need to rub it in. When I need help filling in the form to get my bus pass, I’ll let you know, OK?

I have only two more things to add, for now. One issue is that if we use the lens as a viewfinder, as any DSLR does, we need as much light-gathering as possible when viewing. To allow this, the control system in the camera keeps the lens at maximum opening until the shutter button is pressed to take the shot. Only at this point is the aperture reduced to the chosen setting by the electronic and mechanical systems in the camera. And the final question is, if high light-gathering is good, why do we bother with an adjustable aperture system at all? The answer to that will be discussed in another post. Watch out for the letter D!

Back of Lens

In this picture of the back of a lens (click on it to enlarge it) you can see the diaphragm blades and (just) the hole in the middle. Also, to the left of the optical part, you will notice the little sticking-up bit that connects with the camera to work the adjustment of the blades.

Thank you for reading. Please put feedback – or questions – in a comment!

I’m linking this post to:

Diary of an imperfect mum
and:
A Mum Track Mind

Cuddle Fairy

Life Loving Linkie

It's kind to share!
facebooktwittergoogle_pluspinterest

My Sunday Photo: 5 June 2016

Raspberry FlowersThis shot of raspberry flowers is something of an experiment; I was testing out a new acquisition – a 50mm lens. I purposely used a wide aperture setting to keep the depth of field small, as something of an art form. If you click on the picture to enlarge it, you will see that only certain parts are in focus, giving a rather delicate effect. So I’m giving you, not what I saw exactly, but what I want you to see. A kind of impressionism, if you like.
In passing, I’ll explain a couple of terms that often get mixed up: this lens is both a prime lens and a marque lens. A prime lens has a fixed focal length (i.e. does not have a zoom function.) Generally, they have better optical performance than zoom lenses (at similar price points) but are more challenging to use – composition becomes more of an art! A marque lens is simply one made (or, at any rate, branded) by the camera manufacturer – in this case a Pentax lens for a Pentax camera – as distinct from one from an independent lens maker, such as Sigma or Tamron, for instance.

It's kind to share!
facebooktwittergoogle_pluspinterest